Arduino Programming
Heyy guys welcome back to my blog 😄, this would be the last blog I will be posting before the school holidays comes and. Today I would be sharing with you my experience and what I have done for the Arduino Lessons. Do read on as I would be sharing some wonderful and interesting pictures.
There are 4 tasks that will be explained in this page:
1. Input devices:
a. Interface a potentiometer analog input to maker UNO board and measure/show its signal in serial monitor Arduino IDE
b. Interface a LDR to maker UNO board and measure/show its signal in serial monitor Arduino IDE
2. Output devices:
a. Interface 3 LEDs (Red, Yellow, Green) to maker UNO board and program it rot perform something (fade or flash etc)
b. Include the pushbutton on the MakerUno board to start/stop part 2.a above
For each of the tasks, I will describe:
1. The program/code that I have used and explanation of the code. The code is in writable format (not an image)
2. The sources/references that I used to write the code.program.
3. The problems I encountered and how I fixed them.
4. The evidence that the code/program worked in the form of video of the executed program/code.
Finally, I will describe:
5. My Learning reflection on overall Arduino Programming activities
Input devices: Interface a potentiometer analog input to maker UNO board and measure/show its signal in serial monitor Arduino IDE.
1. Below are the code/program I have used and the explanation of the code.
2. Below are the hyperlink to the sources/references that I used to write the code/program.
Youtube link: https://www.youtube.com/watch?v=yyG0koj9nNY
3. Below are the problems I have encountered and how I fixed them.
As this was the first exercise I couldn't even connect my code with my board. I asked around for help however as I was using a Apple MacBook which was not the same as what most of my friends were using, they didn't know how to help me. I turned to Mr Chua for help and initially it we didn't know what went wrong but after clicking around with the guidance of Mr Chua I could finally run my code.
4. Below is the short video as the evidence that the code/program work.
Youtube Video: https://youtube.com/shorts/XInyE4M8nb0
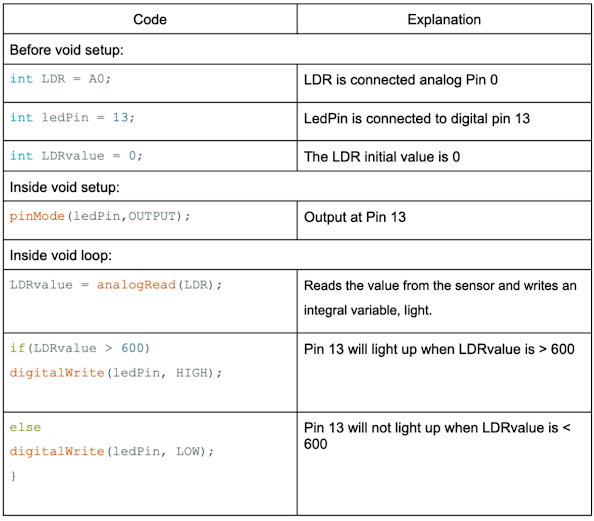
Input devices: Interface a LDR to maker UNO board and measure/show its signal in serial monitor Arduino IDE.
1. Below are the code/program I have used and the explanation of the code.
2. Below are the hyperlink to the sources/references that I used to write that code/program.
SP Brightspace Portal:
3. Below are the problems I have encountered and how I fixed them.
I did not encounter any problem while conducting this after the first exercise, I was confident about my abilities and after following the lesson package I was able to complete it in a short time without much issues.
My friends however had issues making the LED light up even after he covered the LDR. After trying to solve it for a few minutes we realise that covering with our hands was not effective enough and we used a cloth to cover the LDR instead which worked. We used our shirt as cloth to completely cover the LDR
4. Below is the short video as the evidence that the code/program work.
Youtube Video: https://www.youtube.com/shorts/I3O0sctEdDI
Output devices: Include pushbutton to start/stop the previous task
1. Below are the code/program I have used and the explanation of the code.
2. Below are the hyperlink to the sources/references that I used to write that code/program.
3. Below are the problems I have encountered and how I fixed them.
There were many connections and wires that was needed to be connected and I struggled to connect it properly which caused it to not turn on correctly.
After many attempts I asked my friend to help me double check my connections and it managed to work afterwards.
4. Below is the short video as the evidence that the code/program work.
Youtube Video: https://www.youtube.com/shorts/_XpnZ18hpHM
Below is my Learning Reflection on the overall Arduino Programming activities.
Ardurino Programming was an eye opener for me as it was the first time I have tried coding 😳. The idea of coding was extremely daunting initially as since I was young I have been watching sci-fi movies where coders in the movies type with extremely fast speed😵💫. However, after a few weeks of Arduino Programming lessons including a practical lesson where we had to make the wings of a unicorn flap naturally it didn't feel as scary as it once was. I learnt numerous coding techniques and ways to manipulate the code such that the board does what I want.
For instance if
1. I want the program to be delayed I need to type delay()
2. To turn on and off the pin is digitalWrite()
3. Loop the programme I will have to use void loop()
This is to just to name a few. Overall I really enjoyed my experience with coding with the Arduino Uno Maker board and I would definitely participate in activities similar to this in the future 😋


Comments
Post a Comment